Monday, August 22, 2011

My Take on "Mermaid Nails"

A few days ago I saw this post on Cupcakes and Cashmere about "Mermaid nails."  


I loved the look of this DIY manicure, the cool summer color, the hint of sparkle.  The only problem is that my finger nails are in no state whatsoever to be painted and photographed... I pick at my cuticles you see...

So I thought I would give this technique a try, but on my toes.

So I picked out a matte (read non-metallic) nail polish, bought some coordinating Martha Stewart glitter (OMG is this the best glitter in the world!  This is not glitter for small children... this is the good stiff... grown up glitter YEAH!) and set to work. 

I decided that glitter on one toe nail would look strange so I glittered all of them... I love the result!


(Yes, I took this picture in my office!)

Friday, August 19, 2011

Border's Going Out of Business Sale Sucked Me In Again

Now that the discounts have dropped even further I decided to take one more stroll through Borders to see if there was anything left in the crafting section... I scored big time!

I walked away with this one:


This one:


and this one, because, well, everyone needs more veggies in their diet


I am NOT going back... hold me to that people!

Thursday, August 18, 2011

Fabric Love

So I have been completely gripped by fabric love... or maybe more appropriately fabric lust.  It started when my mom and I took an impromptu trip to Lancaster, PA last Saturday.  The section at the Amish fabric stores and local quilt shops are ten times better that what I can find at my local Joann's and the prices are way better.  I mean, Robert Kaufman organic cotton for $8.49 a yard... seriously!  So I bought a bunch of fabric that I plan to make several tops out of (that is after I get my sewing machine fixed).

The problem is that the fabric lust does not actually go away when I leave Lancaster.  So when I found these coordinating Lab prints on Robertkaufman.com I had to buy a few yards of each... they are just too cute.


Friday, August 12, 2011

The Bathroom Rennovation is Complete!!!!!

Admittedly these are kind of terrible pictures, but you what you can see is the transformation from Brown, falling apart 1970s bathroom, to white, shiny clean, brand0spanking-new, timeless bathroom.

Before:


After:


Hala-FRICKIN-leuja!!!!

To Dye For

Once upon a time I have a white shirt that looked something like this:


Then one day the polo shirt was worn while painting with a certain little person named Nate.  Nate assured the polo shirt that the paint was washable and the polo shirt would look as good as new after a good scrub in the washing machine.  The polo shirt took the plunge (twice) but the "washable" paint would not come all the way out and so the poloshirt looked something like this:

So, the polo shirt sought help from a beautiful fairy queen.  The fairy queen decided to try a new procedure/spell to try and bring new life to the polo shirt.  Now, she had never done this herself before, but she had seen it work on lots of other blogs with great results.

So the fairy queen got out the magic potion,


Mixed it together and bathed the polo shirt in it,


And after a short time the polo shirt emerged.  Renewed and revived the polo shirt loved its new Teal/Turquois color and lived happily ever after.


Tuesday, August 09, 2011

A Brussel Sprout Recipe for Brussel Sprout Foes

The first time I had this was Thanksgiving. My mother-in-law brought it. It looked really good and although I don't really like brussel sprouts I would try them. OH MY GOD, are they good. I asked about the recipe and my mother-in-law and she said it was a Barefoot Contessa Recipe. I found it online, here it is:

Ingredients
2 tablespoons good olive oil
6 ounces Italian pancetta or bacon, 1/4-inch dice
1 1/2 pounds Brussels sprouts (2 containers), trimmed and cut in 1/2
3/4 teaspoon kosher salt
3/4 teaspoon freshly ground black pepper
3/4 cup golden raisins
1 3/4 cups Homemade Chicken Stock, recipe follows, or canned broth 


Directions

Heat the olive oil in a large (12-inch) saute pan and add the pancetta. Cook over medium heat, stirring often, until the fat is rendered and the pancetta is golden brown and crisp, 5 to 10 minutes. Remove the pancetta to a plate lined with a paper towel.


Add the Brussels sprouts, salt, and pepper to the fat in the pan and saute over medium heat for about 5 minutes, until lightly browned. Add the raisins and chicken stock. Lower the heat and cook uncovered, stirring occasionally, until the sprouts are tender when pierced with a knife, about 15 minutes. If the skillet bcomes too dry, add a little chicken stock or water. Return the pancetta to the pan, heat through, season to taste, and serve.

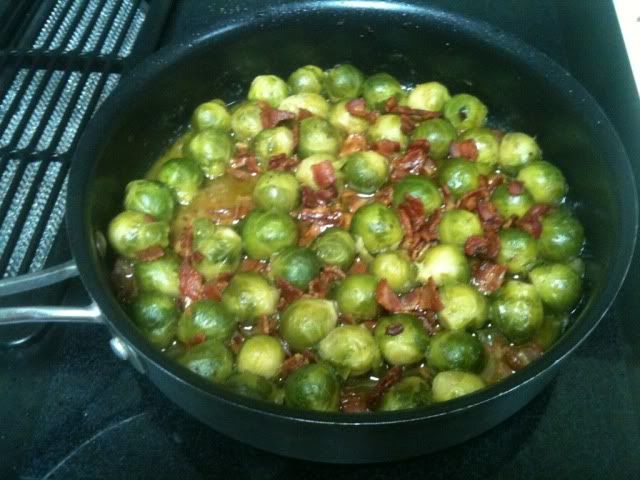
Yeah, anything cooked in bacon fat is going to be good.  I leave out the golden raisins because I think they are creepy.

And here is the end result... yum!


Saturday, August 06, 2011

Halloween Quilt

My mom makes beautiful quilts.  Something that I admire greatly as I do not have the patience to cut out all those little pieces let alone put them back together.  I actually have, in my house, 7 quilts that she has made.  I will be taking pictures of all them and posting them shortly, but for the moment here is the latest one... a Halloween Quilt.


And another view of the quilt

Marshmallow Pops

So between a week of potty training (it worked this time, bye, bye diapers) and having to be home for the contractors renovating the bathroom, Nate and I have spent a great deal of time inside the house.  Team that with triple digit temps and that means that I have had to get really creative to keep the little guy (and myself) entertained.  Thus, marshmallow pops.

Supplies

Lollypop sticks (or drinking straws or Popsicle sticks or bamboo skewers or chopsticks)
Big Marshmallows
Melted choclate
An assortment of jimmies, colored sugars, sprinkles
 Wax paper/parchment paper/aluminum foil coated plate or tray

Step one:
Stick the lollypop sticks in the marshmallows

Step two:
Dip the marshmallow in the melted chocolate.  Repeat as necessary.  [I showed Nate how to do this once and he did he rest]

Step three:
Dip the now chocolate coated marshmallow in the jimmies, colored sugar and sprinkles of your choice.  [Nate had a ball with this one.]

Step four:
Put finished marshmallow pops on a wax paper/parchment paper/aluminum foil coated plate and pop in the fridge for a few minutes to harden the chocolate.

Your end product will look something like this:


Nate had a blast, he got to "cook" something on his own, we all got a treat for alter and it ate up and hour of the day... all in all a successful project.

Happy Meal Toy Wreath

I was trolling some craft blogs a while ago and found this tutorial on how to take junky little toys and make them into a wreath for a playroom.  I thought this was a genius idea and decided to actually make said wreath.  Now, this completely gives away that, yes I let me kid eat McDonalds; and yes, I let him do it more than once, obviously if I have enough toys to make a wreath out of.

In my defense... I have been saving these toys for something like 2 years... I'm not a bad mother...ok, I'm back now...

I did actually run out of happy meal toys before I thought the wreath was finished so I stole a few of Nate's toy cars, plastic cowboys and native Americans, and a few pieces of toys that left the house long ago.

Anyway I think it is super cute (in a tacky kind of way)


and an close up of two different sections


Friday, August 05, 2011

Parsley Thief

Caterpillars of all shapes and sizes freak me the F*** out so I do my best to avoid them.  The funny thing is they have a way of finding me, I guess they can sense fear.

I am not much of a gardener, but I did have one sad looking parsley plant on my patio.  That was until I noticed that a parsley caterpillar had moved in... it took him three days to eat every leaf off my plant.  Then he moved on or got eaten by something else.  Here is a quick  video of him nom, nom, nom-ing away on my plant.


FYI... this little guy turns into this when he grows up

Making Recycled Crayons

This seems to be a pretty popular activity to do with kids and since there are always a lot of broken crayons around my house I thought it might be fun to make recycled crayons.  Here are the traditional instuctions:


  1. Gather up all of your broken crayons, and cut them into small pieces. (An adult will need to complete this step.)
  2. Preheat the oven to 250 degrees.
  3. Fill the muffin tin with an inch-thick layer of crayon pieces. (I used silicone ice molds from Ikea)
  4. Bake 15-20 minutes, or until the wax is melted.
  5. Allow the tin to cool; then pop out the crayons, and they're ready for use.
I was trolling a couple of blogs and found that someone had taken advantage of the record breaking heat this summer and made the crayons on the dashboard of her car.  You can read about it here.

I was thinking that I would try that, since I didn't really want to turn on my oven when it was 105 degrees (no really it was 105 out).  Then I realized that this wouldn't really work for me because the driveway where I park is pretty well shaded.  So I decided to just set my molds out in the sun and see what happened.


Here are the molds loaded up with broken crayons


And this is where I stuck them... on top of the grill


It worked like a charm.  In fact, they were so hot that I had to get a potholder to carry them back into the house.  Talk about harnessing the power of the sun!